
Most people who cancel cable do it in the wrong order. They phone the provider, hand back the box, and only then start working out what replaces it. A week later they are watching the hockey game on a laptop balanced on the ottoman, wondering why the stream keeps freezing in the second period.
This guide runs the other way. You set up the replacement first, live with both for a little while, and cancel only once you are sure. It is written for Canadian households specifically, so it covers the things that actually trip people up here: bundled internet pricing, evening congestion on the big ISPs, French and English viewing under one roof, and what happens to local news once the cable box goes back.
Nothing here needs technical skill. If you can install an app on a phone, you can do every step below.
- Write down what you actually watch
- Read your cable contract first
- Test your internet at the hour you watch
- Know your ISP's habits
- Pick the device for each TV
- Choose a player app
- Run both services side by side
- Set up the guide, favourites and catch-up
- Decide what to do about local channels
- Cancel cable cleanly
- What you will actually save
- Cutting the cord as a sports fan
- Households with more than one TV
- Setting it up for parents and grandparents
- Your first week without cable
- Mistakes to avoid
- Choosing a provider you can trust
Step 1: Write down what you actually watch
Before you compare a single price, spend one week keeping a rough list of what gets watched in your house. Not what you think you watch. What actually ends up on the screen. A sticky note on the fridge is plenty.
Most households discover the same thing. Out of the hundreds of channels in a typical cable package, the family returns to a small handful with any regularity. There is usually one sports channel someone cares about deeply, a news channel or two, a few the kids lean on, and a long tail of channels nobody has opened in a year.
That list tells you three useful things:
- Which live channels matter. These are your non-negotiables. Whatever replaces cable has to carry them reliably, at the times you watch them.
- How much is live versus on demand. If most of your viewing is films and series rather than live broadcasts, catch-up TV and video on demand matter more to you than the raw size of the channel list.
- Who watches, and where. Two people watching different things in different rooms at the same time is a very different requirement from one TV in the living room.
Keep the list somewhere safe. You will use it in step 7 to check the new setup against the old one, channel by channel, before you cancel anything. It is also the best defence against a sales pitch. When someone tells you a package has thousands of channels, you will already know which twelve you need.
Step 2: Read your cable contract before you touch anything
This is the step people skip, and it is the one that costs money. Log into your account online or dig out the last agreement you signed, and look for three things.
The notice period. Many providers ask for advance notice before a cancellation takes effect, often around 30 days. If you cancel on the last day of a billing cycle without checking, you may be charged for another month anyway. Know the date before you call.
Promotional terms. If you signed up on a promo price with a fixed term, leaving early can trigger conditions spelled out in that agreement. If you are close to the end of a promo, it is often cheaper to wait it out and use those last weeks to test your replacement properly.
Your bundle. This is the big one in Canada. A lot of households get TV and internet from the same company, and the internet price quietly depends on keeping the TV. Drop the TV and the internet bill can jump, because the bundle discount disappears with it. Ask the provider directly what your internet will cost on its own once television is removed, and get the actual number. Sometimes that answer makes a different internet plan, or a different ISP altogether, the smarter move.
None of this is a reason not to switch. It just means you should know the real exit cost, so the savings estimate you build later is honest rather than optimistic.
Step 3: Test your internet at the hour you actually watch
IPTV runs over your home internet, so your connection becomes your new cable line. The good news is that the bar is lower than most people assume. A stable 15 Mbps is comfortable for HD, and 25 Mbps covers 4K. Most Canadian home internet plans sold today are well above that on paper.
The word that matters there is "stable", and the time that matters is the evening. A connection that tests beautifully at 10 a.m. can behave very differently at 8 p.m. on a Saturday, when everyone on your street is streaming at once. So run your test when you would actually be watching.
Use our IPTV speed test for Canada, which measures your connection to our Canadian edge rather than to some random server overseas, then repeat it two or three evenings in a row. You are looking for consistency more than a big headline number. If you want the reasoning behind those figures, our guide to how much internet speed you really need for 4K IPTV breaks it down by household size and number of screens.
Two practical tips while you are at it:
- Test from where the TV actually sits. Wi-Fi two rooms away from the router is not the same connection your phone gets standing right beside it.
- Consider a cable for the main TV. An ethernet cable from the router to the streaming device removes the most common cause of evening stutter before it ever happens. If running a cable is impractical, a powerline adapter or a mesh Wi-Fi node near the TV is the next best thing.
Step 4: Know your ISP's habits
Every large Canadian ISP has its own pattern of busy hours and routing quirks. None of them are deal-breakers, but knowing what to expect stops you blaming the wrong thing when a stream wobbles on a Friday night.
We keep dedicated guides for the networks most Canadian households use:
- Bell Fibe: the settings and DNS change that help when video slows down at peak hours
- Rogers Ignite: keeping streams steady on Ignite connections
- Telus: fixes for evening buffering
- Vidéotron, Shaw and Cogeco: the equivalent steps for those networks
The common thread is routing. A stream that has to travel a long, crowded path to reach you is more likely to stutter at busy times than one served from close by. That is the reason we deliver from Canadian edge locations in Toronto, Montreal and Vancouver, and our ISP optimization overview explains the approach in more depth.
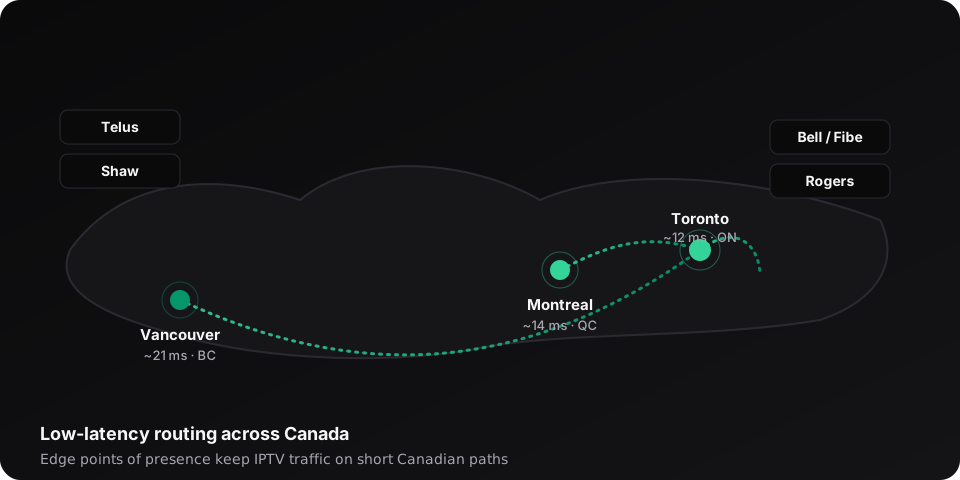
For you, the takeaway is simple. If you do see buffering after switching, check the guide for your ISP before assuming the service itself is at fault. Most evening problems turn out to be local and fixable in a few minutes.
Step 5: Pick the device for each TV
There is a decent chance you already own a capable streaming device. Before buying anything new, run our IPTV compatibility checker against the TVs and boxes in your house.
Here is how the common options compare in day-to-day use:
- Amazon Fire TV Stick. The most popular choice in Canada for good reason: inexpensive, small, and easy to set up. The 4K models handle everything we stream. Our Fire TV Stick setup guide walks through it screen by screen.
- Samsung and LG smart TVs. Recent models can run an IPTV app directly, so there is no extra box at all. The process differs between Samsung's Tizen and LG's webOS, which our Samsung and LG smart TV guide covers in detail.
- Android TV and Google TV boxes. The most flexible option, with the widest choice of player apps.
- Apple TV. Polished and stable, and a natural pick if your household already uses iPhones and iPads.
- MAG boxes. Purpose-built set-top boxes that feel the most like a traditional cable box, which some people genuinely prefer.
Phones and tablets work too, and they are handy for the kitchen, the backyard or the cottage. See the setup notes for iPhone and iPad and for Android phones.
One honest piece of advice: older smart TVs are often the weak link. If your TV's built-in apps already feel slow to open, an inexpensive streaming stick plugged into the HDMI port will usually give you a far better experience than wrestling with the TV's own software for years.
Step 6: Choose a player app
With IPTV, the service and the app are two separate things. The service supplies the channels. The player app is the interface you scroll through on the couch. That split surprises people coming from cable, but it works in your favour, because you get to choose the interface you actually like.
The names you will see most often are TiviMate, IPTV Smarters and GSE Smart IPTV. They all connect the same way, using either an M3U playlist or the Xtream Codes login details we send at activation. Xtream Codes is usually the better choice, since it pulls in the programme guide and catch-up information along with the channels, so you land on a proper TV-style grid rather than a long list of stream names.
For a side-by-side look at guide layouts, recording and catch-up support, our roundup of the best IPTV player apps for 2026 covers the details. For most people coming from cable, a player with a grid-style guide feels the most familiar, and that familiarity matters more than any feature list once the rest of the family has to use it too.
Step 7: Run both services side by side
This is the step that makes the whole switch painless. Keep cable running while you test the replacement for a couple of weeks. Yes, you pay for both for a short while. Think of it as cheap insurance.
Start with our free trial to confirm the basics on your own TV and connection. When you are ready to test properly through a full run of evenings and weekends, the 1-month plan is designed for exactly that: one payment, no contract, and nothing that renews on its own.
During the overlap, go back to the list from step 1 and work through it deliberately:
- Find every channel on your list and add it to your favourites.
- Watch at least one big live event in the evening, when networks are at their busiest.
- Check the programme guide on a channel you use daily. Is it accurate a few days ahead?
- Try catch-up on a show you missed earlier in the week.
- Ask the least technical person in the house to find something to watch, completely unaided.
That last test is the real one. If the person who never touches the remote can use it without calling you over, you are ready to cancel. If something on your list does not work the way you need, you have found out while cable is still connected, and you can raise it with support or walk away. Our 7-day refund policy covers you if the service turns out not to be a fit.
Step 8: Set up the guide, favourites and catch-up
A fresh IPTV account shows you everything at once, which can feel overwhelming next to a cable lineup you have used for years. Twenty minutes of tidying turns it into something that feels like home.
Build a favourites list first. Every good player app lets you mark channels as favourites and open straight into that list. Put your step 1 channels in it, in the order you want them. This single change does more for day-to-day comfort than anything else on this page.
Hide what you will never watch. Most players let you hide whole categories. If nobody in the house watches channels from certain regions or genres, hide those groups so scrolling stays quick.
Give the guide time on day one. When you first log in, the electronic programme guide downloads several days of listings in the background. It can look patchy for a few minutes. That is normal, and it fills in by itself.
Learn where catch-up lives. Catch-up lets you go back and watch a programme that has already aired. On channels that support it, it removes most of the reason people used to depend on a cable PVR.
Set up French and English separately if you need both. Bilingual households often find it easiest to keep two favourites lists, one per language, so nobody has to scroll past the other half of the lineup.
If you get stuck at any point, our installation guide covers the login steps for every major device.
Step 9: Decide what to do about local channels
Here is something many cord-cutting guides leave out. In most Canadian cities, a number of local broadcast channels are transmitted over the air for free. A simple indoor or rooftop antenna plugged into your TV can pick them up with no subscription at all, and the picture is often excellent.
You do not need an antenna to cut the cord. But some households like having one as a backup, particularly for local news and weather during storms, when power and internet can be less dependable. In and around the larger cities reception tends to be good. In rural areas it depends heavily on distance and terrain, so check what you can receive at your address before buying anything.
Think of it as belt and braces. IPTV is your main service. The antenna is a no-cost fallback that sits quietly behind the TV until the day you need it.
Step 10: Cancel cable cleanly
Once the overlap has convinced you, cancelling is mostly admin. A few habits keep it clean.
- Keep a record. Cancel in writing where you can, or note the date, the time and the name of the person you spoke with. Ask for a cancellation confirmation number.
- Return every piece of equipment. Cable boxes, PVRs and remotes are usually rented, and unreturned equipment can be charged back to you. Get a receipt when you drop them off.
- Confirm your new internet price. If TV was bundled, check that your internet has been re-priced the way you were told in step 2, and read the next bill to make sure.
- Expect a retention offer. Providers often offer a discount when you call to cancel. Compare it honestly against your own numbers in the next section. Occasionally it is worth taking for a short while. Usually the gap is still large.
Then check your first bill after cancellation line by line. Mistakes happen, and they are far easier to fix in the first month than the sixth.
What you will actually save: a worked example
Savings claims online tend to be wildly optimistic, because they compare a full cable bill against an IPTV plan and ignore everything else. Here is a more honest way to do the math using your own numbers.
Take a hypothetical household whose bill shows the TV portion at $85 a month after fees, with internet bundled in.
- Remove the TV portion: $1,020 a year saved before anything else changes.
- Add back the lost bundle discount: say internet goes up by $10 a month once TV is gone. Subtract $120.
- Add the IPTV plan: the 12-month plan is $78.99 CAD for the year, which works out to about $6.58 a month for one screen.
- Add any one-off hardware: perhaps a streaming stick for a second TV.
In that example the household keeps roughly $820 a year after the IPTV plan and the internet increase, before any hardware. Your numbers will be different, and that is the point. Plug in your own bill rather than trusting anyone's headline figure, ours included.
If you are still deciding how long a plan to commit to, our IPTV plan length guide compares the 1, 3, 6 and 12-month options by real cost per month. Every price is also listed on the pricing page.
Cutting the cord as a sports fan
Sport is the reason most Canadian households held onto cable for as long as they did. It is also where a careless switch hurts the most, because live sport punishes a weak setup more than anything else. A dropped frame in a drama is annoying. A frozen picture in overtime is the kind of thing that ends the experiment on the spot.
So treat sport as the hardest test of your overlap. Watch a full game on a busy evening, ideally on the TV you will actually use, and pay attention to two things: whether the stream holds steady from start to finish, and how far behind the live action it runs compared with what you see on your phone or hear through the wall from the neighbours.
For hockey specifically, our guide to watching NHL hockey on IPTV without blackouts or lag covers the settings that matter most on game night. If you follow European football, how to watch the Premier League and soccer on IPTV in Canada deals with early kickoff times and setup.
A wired connection to the main TV pays for itself here more than anywhere else. If you only take one technical step from this entire guide, make it that one, for the TV where the big games get watched.
Households with more than one TV
Cable usually charged extra for every additional box. IPTV handles extra rooms differently, and it is worth understanding before you choose a plan.
You can install the player app on as many devices as you like. What a plan limits is how many screens stream at the same time. A 1-device plan is perfect if one person or one TV does most of the watching. If two people regularly watch different things at once, you want a 2-device plan. Three simultaneous viewers, a 3-device plan.
The per-screen math is friendlier than most people expect. On a 12-month term, two simultaneous screens cost $128 CAD for the year and three cost $178, which brings the cost per screen below that of a single-screen plan. All of the multi-screen options are laid out on the pricing page under the device tabs.
A good rule of thumb: count the most screens that are realistically in use at once on a busy evening, not the number of TVs you own. Plenty of families with three TVs only ever have two switched on at the same time.
Setting it up for parents and grandparents
A lot of cord-cutting happens on behalf of someone else. An adult child notices what their parents pay for cable and offers to sort it out. That is a kind thing to do, and it goes well when you plan for the person who will actually use it every day, not for yourself.
Three things make the biggest difference:
- One remote. If at all possible, set things up so the TV and the streaming device respond to a single remote. Many streaming sticks can control TV power and volume once paired. Two remotes on the coffee table is where frustration starts.
- A short favourites list. Load the favourites with the eight or ten channels they actually watch, in the same order as their old cable numbers if you can manage it, and set the player to open straight into that list.
- A written card. A small index card taped beside the TV with three steps on it ("Press Home. Choose the TV app. Pick from Favourites.") prevents more support calls than any amount of explaining.
It also helps to pick the longest plan they are comfortable with, so they are not dealing with renewals. Then do the overlap test from step 7 with them in the room, and let them drive the remote while you watch.
Your first week without cable
The first week after cancelling is when small annoyances surface, and most are fixed in minutes. Expect to tweak your favourites as you notice channels you forgot to add. Expect the guide to need a moment to refresh if the device has been unplugged. And expect someone in the house to ask where a particular channel went, which is exactly why the list from step 1 is worth keeping.
If something genuinely does not work, do not quietly put up with it. Note the channel, the time and the device, then contact support with those details. Specific reports get specific fixes. Within a fortnight most households stop thinking about the switch at all, which is the best sign it went well.
Mistakes to avoid
The same handful of problems come up again and again when households make this switch. Every one of them is avoidable.
- Cancelling first and testing second. Covered above, and still the most common. Overlap for a couple of weeks.
- Judging the service on weak Wi-Fi in a far bedroom. Test where you will actually watch, and use a cable for the main TV if you can.
- Typing login details by hand. One wrong character in a server address looks exactly like a broken service. Copy and paste from your activation email instead.
- Relying on the TV's ageing built-in apps. If the TV's own software is sluggish, an inexpensive streaming stick fixes it.
- Forgetting the bundle. Ask what your internet costs on its own before you drop TV.
- Not returning the cable box. Get a receipt every time.
- Skipping favourites. Twenty minutes of setup turns a huge lineup into something the whole family can use without asking for help.
If buffering does show up after the switch, our Canadian IPTV buffering troubleshooting guide works through the causes in the order they most often turn up.
Choosing a provider you can trust
IPTV is simply a way of delivering television over the internet. It is the same kind of technology used by mainstream TV and telecom products, and our explainer on whether IPTV is legal in Canada goes through what that means in plain language.
What separates one provider from another is how they do business. Before you pay anyone, check for:
- Prices published openly in Canadian dollars, not "message us for pricing".
- A payment method you recognise that leaves a record on both sides.
- A written refund policy with a clear window.
- Terms of use and a privacy policy that actually load.
- A support channel with a real person on the other end.
CheapIPTV publishes all of these. Prices are on the pricing page, payment is by Interac e-Transfer, refunds are covered by a 7-day policy, and you can reach a person through Live Support or by email. If you want to see how IPTV compares with what you have now, our IPTV vs cable TV comparison for Canada and our look at IPTV vs Netflix and Prime lay out the trade-offs side by side.
Whichever provider you end up with, follow the order in this guide: list, contract, speed, devices, overlap, then cancel. Households that switch in that order almost never regret it. The ones that do it backwards are the ones watching the third period on a laptop.
Frequently asked questions
How long does it take to switch from cable to IPTV?
The technical setup takes about ten minutes per device. The full switch, done properly, takes two to three weeks, because you should run both services side by side through several evenings and weekends before cancelling cable.
Do I need a special internet plan for IPTV in Canada?
No. A stable 15 Mbps handles HD and 25 Mbps handles 4K, which most Canadian home internet plans exceed. Stability during evening peak hours matters more, so test at the times you actually watch.
Will I lose my local news if I cancel cable?
Not necessarily. Many households in Canadian cities can pick up local broadcast channels for free with an over-the-air antenna, which makes a handy backup for news and weather alongside IPTV.
Can I keep using my cable box with IPTV?
No. Cable boxes are tied to the cable provider's network and are usually rented, so they go back when you cancel. IPTV runs on a streaming device such as a Fire TV Stick, an Android TV box, an Apple TV or a recent smart TV.
What happens to my internet bill when I drop cable TV?
If TV and internet are bundled, the internet price can rise once the bundle discount goes away. Ask your provider for the standalone internet price before cancelling so your savings estimate is accurate.
Is there a contract with CheapIPTV?
No. Every plan is prepaid for the term you choose, with no automatic renewal. A 7-day refund policy applies if the service is not right for you.
Test it before you cancel anything
Run CheapIPTV alongside cable on your own TV and connection. No contract, no auto-renewal.